Wednesday 20 November 2013

MÒR GOES ROUND


This design is an 'in-the-round' version of MÒR, my Level II Knitting for Beginners class pattern.  And, it comes with all the same great features of that pattern.


Super Bulky yarn is used to make this a quick knit.  No matter what your skill level is, you will find this to be a perfect last minute gift idea, as it knits up in just a couple of nights.


Choose between a super slouchy version (shown here), or a more subtle slouch (see top photo).  Instructions are provided for both, as well as sizing for adult and child.


Plus, you are guided through the pretty spiral decrease at the crown with row-by-row instructions.


Interested in knitting this project?  Here is some helpful information.


SIZES: 
  • Child - 43-46cm (17-18”) [Ladies - 53-56cm (21-22”)]

GAUGE:  8 sts/10 rows = 10cm (4") in Stocking Stitch using 12mm (US17) needles

MATERIALS:  
  • 2-50g balls Big Softie by Sirdar (45m/ 50g)
  • 1 pair 8mm (US11) circular needle
  • 1 pair 12mm (US17) circular needle
  • 1 set 12mm (US17) DPN
  • 1 stitch marker

Quick and fun to knit, this project makes for a great gift or an addition to your own winter wardrobe.


MÒR


Students learning to knit deserve a fun and stylish project.  For teaching Level I Knitting for Beginners, I use my HONEY cowl pattern.  In Level II, my students make MÒR.  It is a slouchy beret, that is knit flat and them seamed.


Super Bulky yarn is used to make this a quick knit, and also create stitches that are easy to identify when sewing up.  And, no matter what your skill level is, you will find this to be a perfect last minute gift idea, as it knits up in just a couple of nights.


Choose between a super slouchy version (seen at top), or a more subtle slouch (shown here).  Instructions are provided for both, as well as sizing for adult and child.


Plus, you are guided through the pretty spiral decrease at the crown with row-by-row instructions.


Interested in knitting this project?  Here is some helpful information.


SIZES: 
  • Child - 43-46cm (17-18”) [Ladies - 53-56cm (21-22”)]

GAUGE:  8 sts/10 rows = 10cm (4") in Stocking Stitch using 12mm (US17) needles

MATERIALS:  
  • 2-50g balls Big Softie by Sirdar (45m/ 50g)
  • 1 pair 8mm (US11) needles (optional -- for cast-off)
  • 1 pair 12mm (US17) needles

Quick and fun to knit, this project makes for a great gift or an addition to your own winter wardrobe.


HONEY


Created for my Level I Knitting for Beginners class, this is a quick and easy project.  The original purpose for the design, means the pattern is worked flat and them seamed, and includes row-by-row instructions.  Rather than the typical "continue in established pattern, until...", you can follow along just reading the next row of instructions.


A pretty, but simple slip stitch pattern creates the honeycomb textured effect in this project.


Great for a last minute gift idea, this cowl can be worked up in just a couple of nights.  It can be knit using one strand of super bulky weight yarn (seen here in Sirdar's Indie, col# 164), 2 strands of bulky weight, or 4 strands of worsted (see top photo, in 4 strands of Cascade 220, col# 8400).  So, you can have a lot of fun using up stash yarn, combining different colours and textures, you name it.


Interested in knitting this project?  Here is some helpful information.


SIZES:  
  • Finished circ. of approx. 58cm (22¾”) and depth of approx. 22cm (8¾”)

GAUGE:  9 sts/14 rows = 10cm (4") in Garter Stitch using 12mm (US17) needles

MATERIALS:  
  • Approx. 90m (98 yds) of bulky weight yarn (such as Indie or Big Softie by Sirdar).  NOTE:  To get more yarn possibilities in this weight, try working with 2 strands of chunky weight yarn, or 4 strands of worsted weight yarn (as shown in photo). 
  • 1 pair 12mm (US17) needles


Quick and fun to knit, this project makes for a great gift or an addition to your own winter wardrobe.


Wednesday 2 October 2013

NORTHERNER


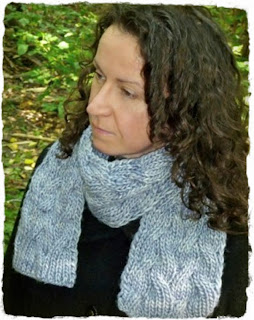
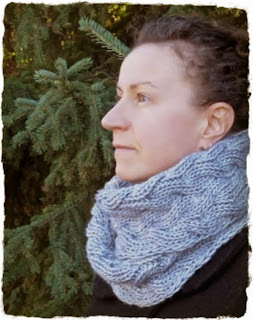
Reversible cables are the ultimate for cabled scarves and cowls.  You never have to worry about them flipping over to show their bad side, because they just don't have one.  Plus, this technique creates a fabric that makes the finished project even warmer and cozier then it's one-sided cousins.  


NORTHENER can be made in any one of three lengths.  By adding a couple of large buttons to one short edge, you can button NORTHERNER closed to form a cowl, or wear it open as a scarf, whenever you please (for this option, be sure to knit one of the two larger sizes).  Of course, if you just prefer scarves, knit it up in either the second or third size and leave as is, button free.


You should also be let in on the often unknown fact that making cables is a deceptively easy technique. And, the pattern includes both written and charted instructions.  The hard part will be deciding whether to make a small cowl, a double wrap infinity/short scarf, or a cosy, long scarf (not pictured).


I used a soft semi-solid, but I think it would look great in any hand-dye, as long as you stay with shades that are light to medium dark.


Interested in knitting this project?  Here is some helpful information.


SIZES:  
  • Small cowl - 60.3cm (23") long and 14cm (5½") wide
  • Double wrap infinity/short scarf - 120.7cm (47½") long and and 14cm (5½") wide
  • Cozy, long scarf - 181cm (71¼") long and and 14cm (5½") wide

GAUGE:  20 sts/18 rows = 10cm (4") in 1x1 Ribbing using 8mm (US11) needles

MATERIALS:  

  • 1 [2, 3] skeins Malabrigo Yarns Mecha, 120m (130yds) per 100g skein
  • 1 pair 6mm (US10) needles (optional -- for cast-off)
  • 1 pair 8mm (US11) needles
  • cable needle
  • 2 large buttons, approx. 3.5cm (1¼") diameter

This project has so many options length and style of wearing, it is sure to fit into any winter wardrobe.


Friday 6 September 2013

ABBIE


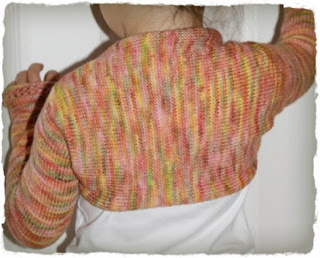
Meet ABBIE, the little sister shrug of ABIGALE.  It really is a girls' sized version of my favourite shrug.  Still a sleek, close fitting garment with optional thumbholes,...


short-row shaping to eliminate unwanted excess fabric in the back,...


and a new, pretty, lace cuff detail (ABIGALE's cuff sports mini cables).


My little model sure had fun playing around the garden in her's,...


and it even met the approval of the garden fairy!


Interested in knitting this project?  Here is some helpful information.


SIZES:  3-4 (5-6, 7-8, 9-10, 11-12) years

GAUGE:  26 sts/38 rows = 10cm (4") in Stocking St on 3mm (US2½) needles

MATERIALS:  

  • 355-395m (388-432yds) of Fingering/4-ply weight yarn (shown above in Manos Del Uruguay Yarn's Alegria, col# A8686)
  • 3mm (US2½)  - 100cm (40 inch) circ. needle or 3mm (US2½) needles & 1 set 3mm (US2½) dpn
  • 1 set 3mm (2½US) dpn, for connecting sides
  • waste yarn for provisional cast-on
  • 4 st holders or waste yarn
  • stitch marker
This project uses a provisional cast-on.  For helpful information on this technique, check out How to Avoid the Provisional Cast-on Pitfall.


Friday 2 August 2013

Inspiration 5


One of several different sidewalk stamps I saw during a stroll down Main St, on a recent trip to Vancouver, BC.  Too fun!


Saturday 8 June 2013

How to Avoid the Provisional Cast-on Pitfall

I tend towards a "there has got to be a way", problem solving personality when it comes to things like my knitting.  This has apparently resulted in developing a way to pick up stitched from a provisional cast-on, avoiding the usual pitfall of ending up with one less stitch than was originally in the cast-on.

I honestly was not aware of this common problem until it was brought to my attention by someone who was making my ABIGALE shrug.  In this pattern, I use a provisional cast-on at the mid-back as the start point for knitting the project.  This wonderful knitter had a very valid concern.  She worried that knitters working with this pattern might be confused by my instructions: "Remove provisional CO, picking up all 140 sts...".  The foreseen problem being that, if casting on 140 stitches, only 139 stitches will be available for pick up from the provisional cast-on.  A very good explanation of this can be found at TECHknitting.  At this link you will find solutions to this problem, but here I will provide one of my own -- avoiding the pitfall all together!


[5Lps4tails.jpg]

The diagram at top was done up to look much like a diagram on TECHknitting (which I have inserted below it), in order to demonstrate how I look at the loops and "tails" from the provisional cast-on differently.  The big difference here is that I include the "tail" on the far left of my diagram, which is created when the ball yarn is pulled up to work the next row of the project.  By doing so, I end up with just as many stitches from "tails", as I had from the loops of the original stitches.  In an attempt to make this clearer, the following is a photo tutorial, demonstrating the pick-up of this final "tail".


I started out by using the Crochet Provisional Cast-on demonstrated in Tubular Cast-on: Part 1, casting on 8 stitches.  I then worked up a number of rows in stocking stitch, using a larger than recommended needle to help make the stitches show up better in the photos.


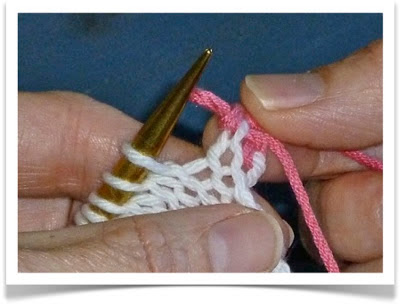
The yellow arrow tab is pointing to the last "tail" which would normally be picked up off the provisional cast-on.  The purple  arrow tab is pointing to the "tail" created when the ball yarn goes up to work the next row.  This "tail" is caught in the waste yarn of the provisional cast-on, just like all the other "tails".


In the photo above, all "tails" have been picked up, minus the last two.  The first from the needle is the "tail" pointed out by the yellow arrow tab in the  previous photo, and the second is the "tail" pointed out by the purple arrow tab.


After picking up the usual final "tail" (the first from the needle in previous photo), what I refer to as the my final "tail" is still caught in the waste yarn.


Pick up this "tail" to create the final picked up stitch from the provisional cast-on.


There are 8 stitches from the original knit portion off the provisional cast-on showing at the bottom of the photo, and 8 stitches from the pick-up at the top of the photo.

This is just one way of dealing with the provisional cast-on pitfall.  Whether you choose to use this, or one of the solutions provided on TECHknitting, I hope that all who purchase ABIGALE will enjoy their finished project!


Saturday 25 May 2013

Inspiration 4


My obsession with Kaleidoscope in Photo Booth continues, but I tried out X-Ray on these Pansies.  Not quite as fun as Kaleidoscope, although I love how the leaf veining shows up, and the halo effect of shadows in X-Ray.

Tuesday 7 May 2013

TRELLIS


This pattern was born out of the arrival, several years ago, of a beautiful new yarn at the LYS where I work.  The yarn was Louet's KidLin Lace.  This yarn is no longer available, but it was literally the combination of a thread-like strand of linen and a fine mohair.  It provided the best of the two yarn families; a light and airy finished product, that also had drape and warmth.

With KidLin out of picture, I reworked this project with the two halves of that yarn.  I also added a shawl size.


Linen and hemp have incredible stitch definition and drape.  They are a great choice for a fashion scarf, or a spring/summer scarf or shawl.  And don't let the rough feel of these yarns turn you off.  After even just one washing, they soften considerably.


The mohair version is feather light, with a soft haze and open, gossamer beauty.


Despite its delicate appearance, mohair provides an amazing amount of warmth.  Out of all the various versions of this project (and I have knit several), my favourite is the mohair scarf.  Made from just one ball of fine mohair, the scarf folds up so small it can be stowed in the most compact of purses, making it easy to have on hand in case the weather takes a turn for the worst.


So many choices in one pattern.  Make a scarf or a shawl, out of hemp/linen or mohair.  Or maybe make your own KidLin-type combination.  You could always make one for each season.


Interested in knitting this project?  Here is some helpful information.


SIZE:  
  • Scarf [shawl] in linen or hemp measures approx. 178cm (70") long and 23cm (9") [46cm (18")] wide, after blocking.
  • Scarf [shawl] in fine mohair measures 147cm (58") long and 23cm (9") [46cm (18")] wide, after blocking.

GAUGE:  

  • 15 sts/22 rows = 10cm (4") in Trellis St pattern on 5mm (8US) needles, blocked, using linen/hemp
  • 14 sts/24 rows = 10cm (4") in Trellis St pattern on 5mm (8US) needles, blocked, using fine mohair


MATERIALS:
  • 280-560m (306-612yds) of linen or hemp yarn, such as Hemp for Knitting's allhemp3 OR 200-400m (219-438yds) of fine mohair yarn, such as Debbie Bliss' Angel or Rowan's Kidsilk Haze
  • 1 pair 5mm (8US)  - 100cm (40 inch) needles
  • 1 pair needles at least one full size larger than 5mm (8US) if using hemp or linen, and at least two sizes larger than 5mm (8US) if using fine mohair 


Wednesday 27 March 2013

Inspiration 3


I was very generously given an iPad mini for my birthday, and the result has been an insane obsession with the Kaleidoscope feature in Photo Booth.  I've been taking photos of everything, including my cat.  This is a photo of a bouquet of roses, which I also got for my birthday.  Hope you like it, as you may see a lot more Kaleidoscope photos in the future!


Tuesday 12 March 2013

ABIGALE

I honestly never thought I would be saying this, but I love shrugs.  When they first started coming into vogue, I couldn't imagine why anyone would want to wear one.  But I have been converted.  Once you've worn one, you totally understand their appeal.  They offer the perfect amount of coverage over a short sleeve or sleeveless top to give that bit of warmth, often needed in the mid seasons of spring and fall, when you don't really want to wear a full sweater.  And this design has some added features that make it stand apart from other similar designs.


You could wear one over a pretty, feminine top for a more dressed up look.....


Or, go totally casual when paired with jeans and a t-shirt.

I chose two beautiful hand-dyes to knit this shrug.  The orange blend is SweetGeorgia Yarns CashLuxe Fine (sorry, it was a second, so you won't be able to find this particular colour-way, but the yarn is beautiful to work with, and SweetGeorgia has a ton of amazing colour-ways to choose from), and the purple is Fleece Artist Kidazzle (which I purchased at my LYS, but doesn't seem to be available anymore on their website).


The pattern is customizable in both the cross back measurement, and sleeve length.  Plus, if you like, instructions are included for an optional thumbhole -- this is my favourite feature!


Either way, the sleeves are finished with an attractive, but subtle textured stitch pattern.


The real exciting feature of this shrug, though, is the back shaping.  A sequence of short rows keeps this knit quick and easy, but eliminates the excess pouch of fabric that appears back of the armholes in other similar designs.  This makes for a very sleek, tailored finish on a simple and versatile accessory.

If you are interested in a girls' version of this shrug pattern, please check out ABBIE.


Interested in knitting this project?  Here is some helpful information.


SIZE:  Ladies S [M, L, XL]
       Finished sleeve measurement at bicep: 
       29cm [31.25cm, 33.5cm, 35.5cm] (11⅓" [12⅓", 13¼", 14"])
       {Instructions are written for a cross back measurement of 40.5cm (16"), with the 
       ability to modify for a personal fit.}

GAUGE:  26 sts/38 rows = 10cm (4") in Stocking St on 3mm (2½US) needles

MATERIALS:  

  • 740-800m (810-875yds) of Fingering/4-ply weight yarn {add or subtract approx. 20m (22yds) for each inch added to or subtracted from cross back measurement}
  • 3mm (2½US)  - 100cm (40 inch) circ. needle or 3mm (2½US) needles & 1 set 3mm (2½US) dpn
  • 1 set 3mm (2½US) dpn, for connecting sides
  • waste yarn for provisional cast-on
  • 4 st holders or waste yarn
  • cable needle
  • stitch marker
This project uses a provisional cast-on.  For helpful information on this technique, visit How to Avoid the Provisional Cast-on Pitfall.

Customize to get the perfect fit and look.  Then, wear and enjoy!