Saturday 29 September 2012

JAZZ


This is a fun little slouch tam, with a lot going for it.  The Brioche pattern in the main body not only gives texture and interest to the look of the hat, but it works up a thicker, loftier fabric.  This equals greater warm!


It has only a slight slouch, for those who don't want to go too big, but are wanting somethings other than the typical toque.  The green version was knit in Cascade 220 for the main colour, and Punta Yarns Mericash Thousand Colours for the multi-coloured contrast.  The Cascade 220 has quite a bit of body, so the hat's slouch has only moderate drape.


However, this grey and pink version has considerably more drape in the slouch.  This comes from the two incredibly soft yarns used in its construction.  Pear Tree Yarn's Super Soft 8ply in Nut was used for the main yarn, and Malabrigo Worsted in Vetiver is the contrast in the Brioche portion of this hat.  (NOTE: When using a yarn as soft as this for your main colour, if you have a smaller head you may want to knit the ribbing with a ½ size smaller needle.)

Besides the change it drape, the Malabrigo Worsted also gives a different look to the Brioche.  Being a single ply yarn, it tends to puff in this stitch pattern, which I really love.  It adds even more to the 3-dimensional quality of the Brioche.  The main body of this version is sooooo soft and squishy!


But no matter what yarn you choose, the back comes together to look something like a giant carnation.  And if you aren't big on colour, this pattern would make a great single colour, textured hat by knitting the whole thing in one solid coloured yarn.

  One more thing to note.  Although you could just use your favourite cast-on method, I introduced the Tubular Cast-on in this pattern to give this hat a cleaner, more professional looking edge.  If you should choose to try out this method, you will find photo tutorials in my two previous posts, Tubular Cast-on: Part 1 and Tubular Cast-on : Part 2.

Interested in knitting this project?  Here is some helpful information.


SIZE:  Average Ladies [54cm-56cm (21-22")] 

GAUGE:  15 sts/19 rows = 10cm (4") in 2 Colour Half Brioche Stitch on 5mm (8US) needles

MATERIALS:  

  • approx. 80m (90 yds) hand-dyed or multi-colouered DK or worsted weight yarn for contrast yarn in Brioche portion of hat
  • approx. 90m (100 yds) worsted weight yarn for main colour yarn in ribbing and background of Brioche portion of hat
  • approx. 1.5-2m (1½-2 yds) of contrasting colour waste yarn
  • 4.5mm (7US) - 40cm (16 inch) circ. needle
  • 5mm (8US)  - 40cm (16 inch) circ.needle
  • 1 set 5mm (8US) dpn
  • stitch marker

This is a very versatile pattern in that by changing colours and types of yarns used, you can create any number of different looks and personalities.  So have some fun with it!


Thursday 27 September 2012

Tubular Cast-on: Part 2

In Tubular Cast-on: Part 1 you got set up with the provisional cast-on, Crochet Cast-on. Now, onto the actual Tubular Cast-on....

Join in your main colour yarn and, starting with a knit row, work 3 rows in Stocking stitch with needles one full size larger than the one used for the ribbing in your chosen pattern (NOTE: If using my pattern, JAZZ , the needle sizes to be used for the Tubular Cast-on are given in the pattern).  Now, transfer all stitches to the actual needle size used for the ribbing in your chosen pattern. 


With the purl side facing, purl the first stitch on the left-hand needle.


Now, insert the right-hand needle, from top to bottom, into the first main colour yarn loop.  It is kind of buried a bit in the Crochet Cast-on.  The more contrast you have between your waste yarn in the provisional cast-on, and your main colour yarn, the easier in will be to find these loops.


Transfer this new stitch to the left-hand needle.  You want to place it on the needle so that the lead leg of the stitch is at the front of the needle, as pictured above.


Now you just have to knit this stitch.

Continue across the row, purling one stitch, then knitting the main colour loop from the provisional cast-on, until one stitch remains on the left-hand needle.  This stitch is the "plus1" that you added to the cast-on count from your pattern.  Being careful not to twist your stitches, join in the round with a p2tog -- that is, purl together the last unworked stitch with the first stitch you worked in forming the Tubular Cast-on.  Now, work in 1x1 ribbing for the length indicated in your pattern.


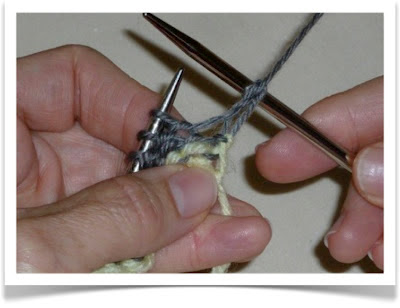
Finally, remove your provisional cast-on.  If you used the Crochet Cast-on, this step is very quick and easy.  Start by undoing the knot from the end of the Crochet Cast-on.  Now, it is a simple matter of pulling on that tail of yarn.  Above, you can see a loop from the Crochet Cast-on and the waste yarn sitting under three loops of main colour yarn.


As you continue to pull, the waste yarn will sit under more and more loops of main colour yarn.  Keep pulling until you have pulled the waste yarn right out of the ribbing.  Don't worry!  Those loops of main colour yarn you see are no longer live stitches.  They are the loops you were picking up out of the Crochet Cast-on and knitting.


Sit back and admire the beautiful, professional edge you have just created on your   soon-to-be hat!

PS: This cast-on is also great for other projects with 1x1 ribbed edges, like mittens.


Friday 21 September 2012

Tubular Cast-on: Part 1

One of the most often asked questions when I'm teaching is, "What is the best cast-on to use?".  My answer is always the same, as I feel there is no one "best" cast-on. Different cast-ons look, feel, and respond differently and the best cast-on is the one that best suits your project.  There are cast-ons like the long-tail and knit-on that will do you for most projects, but why not branch out and try something new.

One of my favourite technique books is Nancie M. Wiseman's The Knitter's Book of Finishing Techniques.  She not only provides great explanations for multiple cast-on methods, but also provides you with a list of pros and cons with regards to where best to use said cast-on.  This is where I was introduced to the Tubular Cast-on.  I have incorporated it into one of my hat designs (JAZZ, which I hope to have online for sale soon -- stay tuned!) as a way to get a very clean, professional looking edge on the brim.  You should give it a try some time.  I guaranty that you will not be disappointed with the results.

To start, I use a Crochet Cast-on (but, you could use any other waste yarn provisional cast-on if you have one you like).  You will need a knitting needle one size bigger than the size you will use to work the ribbed hat brim in, plus an equivalent sized crochet hook.


Make a slip knot with your yarn and place it on the crochet hook.  Now, tension your yarn in the left hand and hold the knitting needle in the left hand, as well.  Be sure to have the yarn positioned under the knitting needle, as shown above.


Now, reach over your knitting needle with the crochet hook, and come under the yarn to wrap the crochet hook.  Draw this wrap of yarn through the slip knot on the crochet hook.  You will now have one stitch cast onto your knitting needle.


Move your yarn around the point of your knitting needle to get it back into position under the needle, as shown above.  You are now ready to cast-on another stitch.  Once more, reach over your knitting needle with the crochet hook, and come under the yarn to wrap the crochet hook (see second photo).  Draw this wrap of yarn through the stitch on the crochet hook.  You will now have two stitches cast onto your knitting needle.

Continue in this manner until you have half the total number of stitches required for your hat, plus 1 (NOTE: In the pattern for JAZZ, the correct count for the provisional cast-on has been given).  Break your yarn, and draw the end through the stitch on the crochet hook.  You've now learned how to do a Crochet Cast-on.  Give it a try in any project where a provisional cast-on in called for.  It is also very easy to remove, as I will show in Tubular Cast-on: Part 2.  The next post will go over the workings of the actual Tubular Cast-on, so see you then.


Thursday 6 September 2012

Toothbrush stitch markers


I have a tendency towards keeping things that I feel show some potential for future use. Now don't get me wrong, as I am in no way a hoarder.  I just hate throwing things in the garbage that aren't obvious garbage.  So, if somethings isn't obvious garbage, can't be recycled, and shows definite potential, I try to re-use it in some way.  That 'way' is not always apparent at the time, but out of the blue it will hit me like a lightening bolt when least expected.  I always like to show off these revelations to those in my life who think I'm a bit nuts to keep these things that they feel are just garbage.  And, this one I will share with you, too.

Case in point:  I use a Philips Sonicare electric toothbrush.  For anyone else who uses one of these brushes, you know that every time you purchase replacement heads, they come with a pouch of coloured rings that snap onto the bottom of the head to identify who in your family each toothbrush head belongs to.  These soft, rubbery rings do not, of course, have a recycling symbol, and you can never use them all.  But, being soft, rubbery rings, they somehow showed some hidden potential, at least in my eyes.  So, I've been keeping them, and I've amassed a decent sized collection, not really knowing what I would ever do with them.......until now!

I've been working on a sweater for a friend (pictured above), that is knit in Sirdar's Big Softie.  Not being a big knitter of chunky yarns, I don't really have the proper accessories.  I managed to find a 10mm (15US) needle to use that was part of a low cost inter-changable kit I was given years ago.  My stitch markers, however, were not quite big enough.  They would fit on the needle, but only barely, so it really slowed down the knitting.  NO FUN :(   Then, the lightening bolt! -- "Those soft, rubbery rings from my toothbrush might just be the right size for using as stitch markers on my large needles.".  And, they were!  They are working brilliantly!  Added bonus:  all those colours they come in make it so I can use one for marking the beginning of my round, and another for delineating the lace panel stitches.

So, (if you happen to use a Sonicare) you too can have toothbrush stitch markers ;)