Friday, 15 February 2013

Surprise Visitor

Lately, I having been spending a lot of time on pattern formatting of new designs.  This always includes the dreaded photo shoot.  It is my least favourite part of self-publishing.  It would be great if I could just come up with an idea, work it out, knit or crochet it up, and someone else would take care of the rest.  However, it doesn't quite work that way.

I do love the places we go to take the photos, though.  There is an abundance of green space here in Calgary, and my favourite is Fish Creek Park.  It is so beautiful, with both plant-life and wildlife.  One time we went for a bike ride, and came around a bend to find deer grazing in a field.  And there are so may different birds.

We were there recently, taking some photos of one of the gift pouches from my Cute Little Crochet Gift Pouches post.  I was holding it in my hands and standing very still, when suddenly I felt something on my shoulder.


Chickadees are such adorable and highly social little birds.  And, this one certainly brightened my photo shoot mood!


Tuesday, 5 February 2013

BIRDIE


BIRDIE is a fun, but feminine slouch hat.  The pretty Drawn Loop Rib band creates a soft framing of the face, while the light-hearted Little Birds stitch pattern in the main body plays with all the beautiful colours of the yarn.  The yarn I speak of is Rios, by Malabrigo.  The very first time I saw it I new knew I wanted to design this hat.

Zarzamora is my first love in the Malabrigo colour line-up.  Splashes of green provide interest, but it has an over-all almost semi-solid appearance.  For this reason, although the multitude of colours in this yarn blend a bit in the background, the little drawn cable cross-overs let each colour stand out on its own at one point or another.


In contrast, Arco Iris creates a more muted finish, despite its very multi-coloured personality.  I love how it is just all colour and texture, but in a vintage, subdued way.  Not matter what hand-dyed yarn or colour-way you choose, this design was made for it.  The stitch patterns were specifically chosen to work with these types of yarns to help break up pooling, while still showing off all of the yarns fabulous colours.

However, I think that a semi-solid or solid colour would still make an incredible hat.  It would just mean that the finished project would be more about texture, and not colour play.


I have to admit that this particular hat, in this particular coulor-way, is my favourite hat to wear.  I like that it has just a bit of slouch, with a hole lot of style.  I have seen people wearing this design down on the forehead, as I do, and also back on the head in a more fashionable way, and both look great.


Interested in knitting this project?  Here is some helpful information.


SIZE:  Average Ladies [54cm-56cm (21-22")] 

GAUGE:  23 sts/32 rows = 10cm (4") in Little Birds stitch pattern on 5mm (8US) needles

MATERIALS:  

  • 1-100g skein Rios by Malabrigo
  • 4.5mm (7US) - 40cm (16 inch) circ. needle
  • 5mm (8US)  - 40cm (16 inch) circ.needle
  • 1 set 5mm (8US) dpn
  • 5.5mm (9US) needles (for cast-on)
  • cable needle
  • stitch marker

Malabrigo's Rios is a beautiful yarn to work with, but any worsted weight hand-dye, semi-solid, or solid will work with this pattern.


Friday, 25 January 2013

Why Do We Teach?

I very recently started reading The Happiness Project, by Gretchen Rubin.  On page 4 she writes, "They say that people teach what they need to learn.".  I'm not sure how I feel about that statement, being a teacher.  I teach knitting and crochet at a LYS on a regular basis, and I love it!  It makes me very happy to share my passion with others, and I feel my real motivation for teaching is just that.  I've even been told by my mom that as a young child, when asked what I wanted to do when I grew up, my responses was to "teach people crafts".

Some of my best childhood memories have to do with knitting and other crafts.  I have been drawn to creating things for as long as I can remember.  I am told that I learned how to knit when I was 3 years old.  I can honestly say that, like learning to walk and talk, I can't really remember the learning part.  Its just something I have always known how to do.  However, I do remember, after watching my mom knit all the time, asking her if she would "show me how to do that".  It is a vivid memory from the first house I ever lived in, so I do know it had to have been from before I started school.

After moving to our new house, I have a memory of the thrill of knitting a pleated skirt for my stuffed panda bear, which I had also knit and sewn together.  I was amazed at how, by simply changing between knit and purl stitches, I could create these perfect folds in my little pink baby skirt.  It felt like I had performed some kind of magic!  And there was the Mary Maxim kit that my mom gave me to learn Fair Isle and Intarsia colour-work techniques, and the satisfaction of giving my stylishly knit potholders to my favourite great aunt, Jessie.

Then, during junior high, I started getting books out of the public library about knitting.  I wasn't much for reading novels, like my best friend, but I could eat up a book on knitting techniques.  That was when I first learned short rows and 3-needle bind-off for creating 'professional looking shoulder seams'.  And, again, it felt like I had performed some kind of magic!

All these wonderful knitting memories I treasure, and I love sharing all that 'magic' I learned with others.  I revel in the "Ah hah!" moments, and nothing feels better than when a student falls in love with knitting, and seeing their enthusiasm and passion grow!  So that is why I teach.

Although, I have to admit, it is not like I don't ever learn anything from my students.  I have learned a bit about what it must feel like to learn something like knitting as an adult, without the safety net of a knowledgable mom to help you out when things go wrong.  I think I have learned through my students how to be a better teacher.  I have even learned a thing or two about knitting in the process.  And, I've learned a lot about people, and have had the great opportunity, through teaching, to get to know so many wonderful ones!  So maybe, in some not-so-direct way, I do teach what I need to learn.  Or, at least I learn because I teach.  And I'm just fine with that!


Monday, 7 January 2013

Knitting Obsessions

I love how we knitters (and crocheters) feed off each others energy.  Who doesn't want to see or hear about the latest project a fellow enthusiast is working on.  Isn't that part of why people read and write knitting blogs?  We get inspired by what others are creating.  And, even if we personally have several projects on the go, there is some kind of energy in the prospect of a new one.

I recently got caught up in this kind of contagium when I read Alana Dakos of Never Not Knitting's latest post, "Hexipuffs!".  In it she talks about her latest knitting obsession being the beekeeper's quilt.  I was intrigued the moment I saw all those puffy little knit hexagons in various colours.  I especially liked the ones with little hearts and flowers on them.  Then I clicked on the link to her Pinterest hexipuff inspiration board, and I was hooked.  I want to make hexipuffs with hedgehogs, cupcakes, and sheep!  Lets face it, I want to make every single one that I saw.

Its crazy, right?  But we all do it.  That creative energy is contagious, and I have absolutely no problem at all with being caught in it's spell.


Monday, 24 December 2012

Cute Little Crochet Gift Pouches


For Christmas this year, I decided to make all of my knitting pals personalized stitch markers.  I wanted to gift them in something that could act as wrapping, and as a purposeful holder for their markers, as well.  I was looking through Sasha Kagan's Crochet Inspiration and found a pretty little stitch pattern that had both an interest texture and a slightly lacy look.  It just seemed perfect for using to make little gift pouches.

Over the years I have amassed a collection of crochet cotton that I am not sure I will ever find enough uses for.  Some I have purchased, and much has been donated.  I have used it for other gifts, like mini granny square bookmarks.  And I am currently creating an organizer for my new purse with some of it (if the organizer works out, you may see a post for the pattern in the future).  With the multitude of colours in my stash, I was able to make a different coloured pouch for each friend.


I've just finished making seven in total (Phew!  Just in time for Christmas!).  They work up quickly, and I think they're really cute.  As a Christmas gift to anyone out there reading this blog, I am including the pattern for these little pouches free in this post.


Cute Little Crochet Gift Pouches


MATERIALS:
  • #10 crochet cotton OR #8 perle cotton (for a silkier looking pouch)
  • 2.25mm (US 1/B) crochet hook


SIZE:  Approx. 6cm (2 3⁄8") wide and 8cm (3 1⁄8") high  [NOTE:  #8 perle cotton        will make a slightly smaller pouch]

TO MAKE:

Using 2.25mm (US 1/B) crochet hook, chain 50.

Foundation row (WS):  Skip one chain, then sc into each remaining chain across (49 sts).  Ch 3, turn.

Row 1 (RS):  *Skip 1 sc, dc into next 3 sc, insert hook from front to back into skipped sc, yo and draw through a long loop, yo and draw through 2 loops on hook; rep from * to last sc, dc into last sc.  Ch 1, turn.

Row 2:  Sc into each st across.  Ch 3, turn.

Repeat Rows 1 & 2 nine times.  Then, work Row 1 once more.  Fasten off.

Finishing:

Fold piece in half with right-sides together.  Sew or crochet seam along side and bottom.  Weave in ends, and turn right-side out.

For ties, work two chains, each approx. 25cm (10") long.  Thread one chain in and out through the holes created by the 9th repeat of Row 1, starting and ending at the seam.  Repeat with the other chain, starting and ending at the fold on the opposite side of the seam.  Weave tails down chain about 2.5cm (1"), then tie ends together.


Enjoy one for yourself, or fill with goodies and gift to your friends!  Merry Christmas and Happy New Year!


Tuesday, 18 December 2012

PLIA


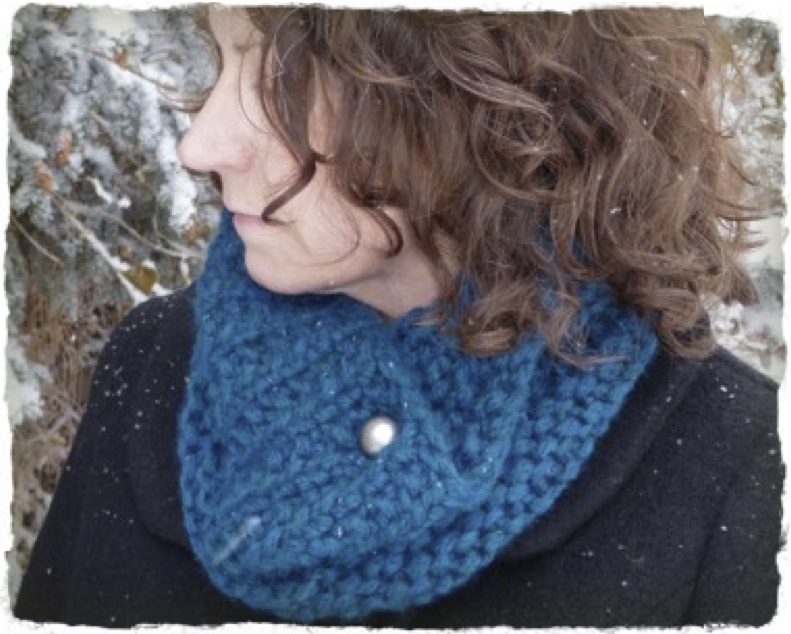
PLIA is the latest creation for my occasional three week Knitting for Beginners class.  I wanted to design something that would knit up quick, and this cowl does.  Any knitter who hasn't just picked up needles for the first time could work it up in an evening, maybe two.

The look I was going for was a thick, cosy cowl with multiple personalities.  I wanted it to go from the typical big rolled cowl like you would see on the neck of a sweater, to something deep enough that you could pull it up over your face when needed.


Something you could cuddle down into.

Then it struck me!  What if there was some way to pin it into a more asymmetrical fold?  Something to style it up a notch.


Enter the two-sided button.  This an old trick that works something like a cufflink.  You can have a large WOW! button on one side, and then a stylish, but smaller button on the other side which can pop right through the stitches of your knitting.


The result is a multitude of different looks!  Depending on the jacket you are wearing, your hairstyle, your mood, whatever, you can choose the cowl style you want to go with it, all from one project.


And because this cowl is reversible, with the two different textured sides shown above, that's two times the multitude of different looks.


You can even wear it as a snood.


Interested in knitting this project?  Here is some helpful information.


SIZE:  Finished circ. approx. 66cm (26"), with approx. depth of 21cm (8¼").

GAUGE:  8 sts and 8 rows = 10cm (4") in Garter Stitch on 12mm (17US) needles

MATERIALS:  

  • 1skein Ushya by Mirasol [approx. 105m (114yds)/100g]
  • 12mm (17US) circ. needle OR 1 pair 12mm (17US) needles
  • 1 medium-sized button AND 1 large-sized decorative button (optional)

(NOTE: Instructions are provided for working this cowl in the round, or flat and seamed.)
Have fun playing with this cowl the create different looks!


Friday, 14 December 2012

BOSIE


I love mittens!  Gloves may allow for more dexterity, but my fingers are still cold.  Only mittens truly keep my hands warm.  And, if you're going to knit mittens, why not have an attractive pair?  With BOSIE I have included three cable variations to choose from to embellish your mittens.  They range in difficulty from easy to more advanced, each given a rating in the pattern.

Above is Hugs and Kisses, my favourite.  It is the most technical cable in the bunch, but definitely doable once you understand basic cables.  I love the whimsical quality of this mitten.


The Classic Cable is rated easy.  It is the most basic cable, but it still makes a very pretty mitten.  The look is more that of elegant simplicity (and yes, I do think mittens can be elegant).


Last, but not least, the Wave Cable creates a more contemporary cabled mitten.  The cable wends its way up the mitten like a snaking river.  Its clean lines speak to a more modern sensibility.

Like the Wave Cable mitten, you could opt for a traditional Aran colour for your mittens, but playing with colour can be a lot of fun.  My only recommendation would be to stay away from very dark colours, like black and navy.  The colour needs to be light enough to show the shadows of the cable twists.  Otherwise, all your hard work would be for not.

Interested in knitting this project?  Here is some helpful information.


SIZE:  Teen/woman's small: 18cm (7") hand circ.
        Woman's medium: 19cm (7½") hand circ.
        Woman's large/man's small 20.5cm (8") hand circ.

GAUGE:  20 sts = 10cm (4") in Stocking Stitch on 4.5mm (7US) needles

MATERIALS:  

  • 100g/approx. 200 m ball/skein of medium weight yarn
  • 1 set 4.5mm (7US) dpn needles
  • 1 stitch holder OR waste yarn
  • 4 stitch markers

With so many options, you will find a mitten to suit anyone!